Horizontal Wood Siding Installation Guidelines using Rainscreen Clip over Plywood or OSB. Before starting your Rain Screen installation, check that these important items have been done properly:
Pre-Check 1 – Make sure your structural sheathing has been attached properly to the framed wall system per manufacturer's instructions and local building codes. Plywood or Oriented Strand Board (OSB) may be used. The panel thickness should be rated for structural application and must be a minimum of 7/16” thick. Plywood is typically stiffer and stronger than OSB. Thicker plywood or OSB makes a stronger wall and has greater holding strength of the screw.
Note*
Foam and gypsum boards are not structural panels. (Installation of the Rain Screen System over non-structural panels is possible – refer to Attachment Channels and alternate installation techniques)
Pre-Check 2 – Make sure the drainage plane material has been properly installed. Use the appropriate AWB (Air and Water Barrier) or WRB (Weather Resistant Barriers) as specified by the architect or designer. There are many products available to address requirements of the exterior wall in your climate zone.
Pre-Check 3 – All windows and exterior doors should now be installed properly. Check to ensure that the installation (and flashing) instructions from the door and window manufacturers were properly followed.
Note* Window and door manufacturer's installation instructions always take precedent over these guidelines.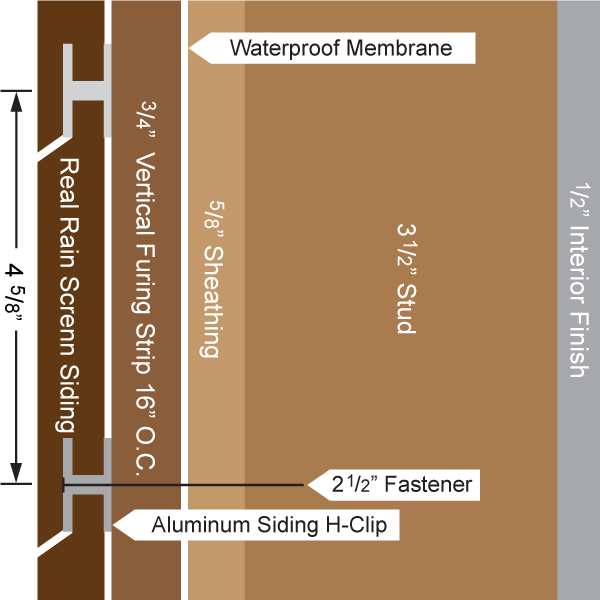
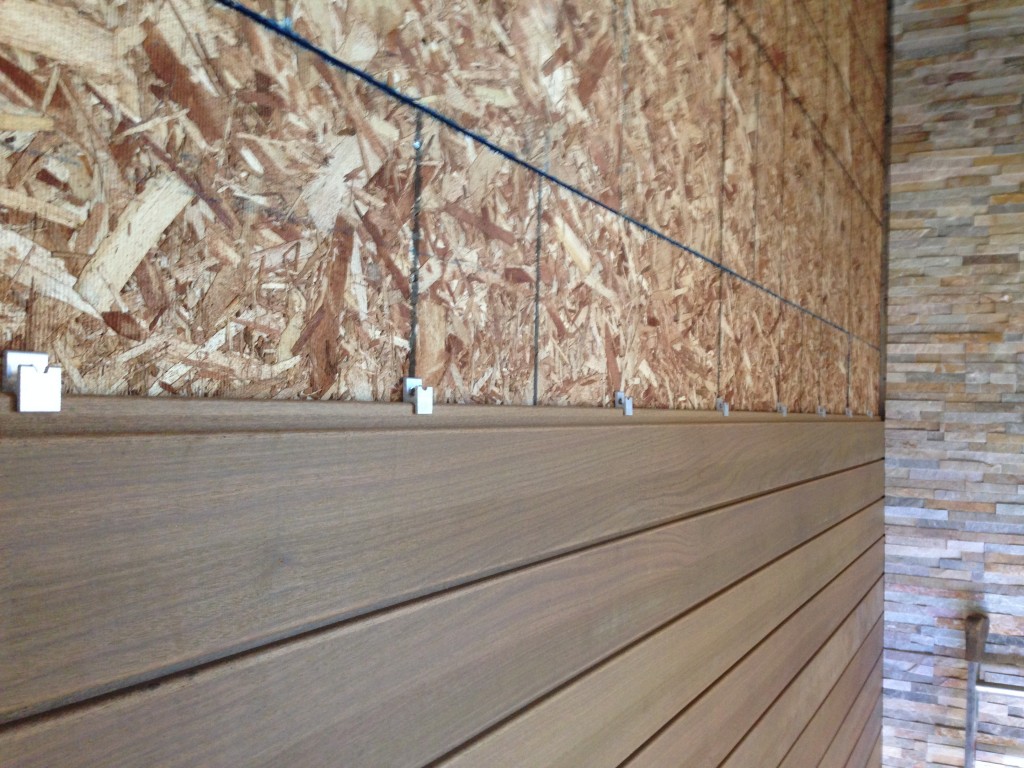
Horizontal Wood Rain Screen Siding Installation Guidelines
CS2 Rain Screen Clip over Plywood or OSB
Step 1 - Proper wood acclimation is imperative. Before starting any exterior wood installation, always make sure your wood has properly acclimated to local site conditions. Failure to properly acclimate wood on site is a recipe for poor results and dissatisfaction. Critical Wood Acclimation Guidelines here.
Step 2 - Pre-finishing all siding boards prior to assembly is the only way to ensure that all 4 sides are coated evenly. It is highly recommended to coat all wood siding with a UV inhibiting sealer prior to installation. A UV inhibiting sealer helps the wood acclimate more slowly and minimizes surface checking and wood movement. Even if your goal is to allow the wood to naturally gray or silver out over time, a UV inhibitor at this point will help protect the wood when it is most vulnerable. Pre-finishing options for hardwood siding and decking here.
Step 3 - Create a level line for the starter rail on all walls where the bottom of the siding will be installed. This can be done with laser lines, or a snapped chalk line. We recommend that you complete this on all walls, to ensure the starter rail level line will be consistent on all sides of the building. This step is critical to a successful siding installation and should be done with accuracy.
*Take the time to do this step well, and all your next rows of siding will be properly aligned as you build.
Step 4 - Install the outside corners you have selected. The rain screen System offers both Aluminum Extrusions and Solid Wood outside corner components, or you may provide your own corners. Regardless of the outside corner you have selected, make sure they are aligned plumb and square level line starter course. This will ensure that the ends of your siding boards will fit precisely with a 90-degree end cut. If you have selected the marine grade aluminum outside corners, install the base piece component now with the screws provided. They are the proper length and are made from stainless steel, the finest choice for your building. (The outside corner finish piece installs after all the wood siding is installed)
Step 5 - Install your window and door trim. We offers window and door trim packages, or you can design your own. Now is the time to install them and put proper flashing in place. Always follow the window and door manufacturer's installation and flashing instructions.
Step 6 - Installing starter course of siding. To speed up your installation and help provide the critical level line to start your horizontal siding installation, use the 8' Starter Rail. The Starter Rail provides a continuous strip at your bottom course of siding. The marine grade aluminum starter rail has pre-drilled holes for mounting to the plywood walls and has weep holes on the bottom to drain any bulk water intrusion.
Step 7 - Install your siding vent. We suggest installing a siding vent screen to prevent insects from entering the wall cavity from the ground. Follow the instructions of the manufacturer. The Cor-A-Vent SV5 siding vent is ¾” thick and fills the rain screen wall cavity between the drainage plane created by the rain screen clips. This siding vent also allows moisture and bulk water to escape as well.
*Note It is also suggested to install the siding vent at the soffit, above door openings and above and below window openings.
A.) If you are using 6" nominal wood siding, align the Cor-A-Vent siding ventilation across the top of the starter rail and fasten them to the sheathing. Roofing nails work well. The assembly will be covered by the siding board in the next step.
B.) If you are using 4" nominal rain screen siding, you will find it easier to install the CorA-Vent on top of the starter rail and cut it to length to fit between the rain screen clips at the top of the first course of siding. This assembly will be covered by the second course of siding as shown on the right.
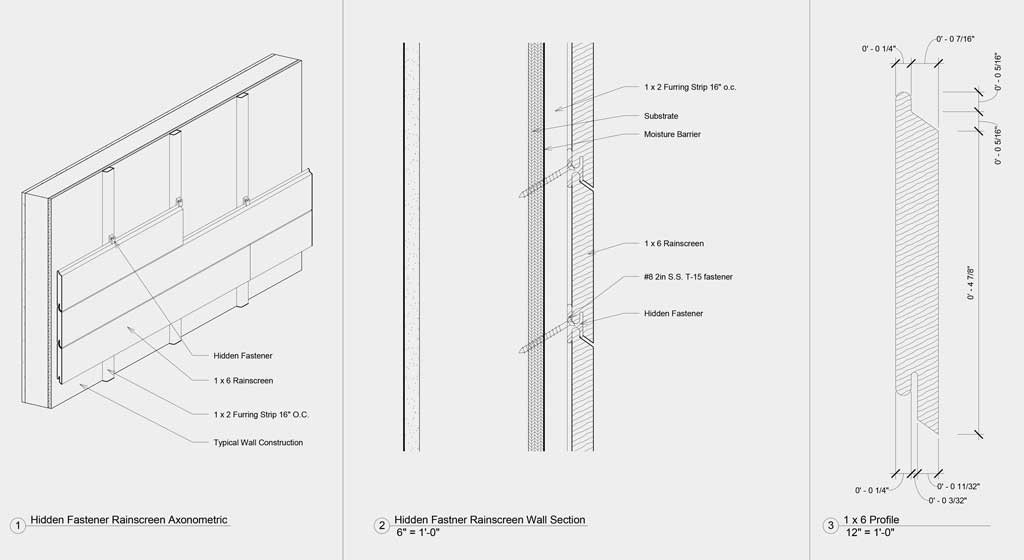
Step 8 - Insert the bottom of a Rain Screen Wood Siding board into the starter rail. Because the wood is likely to have acclimated somewhat, occasionally you may need to use a rubber mallet to seat the board properly into the clip. Seating each board properly gives the best alignment for your wall. Important Note* If your board does not seat properly, don't install it. NEVER ‘force’ a board into place. You may cut out any bow or bend (defect cutting) and install only the usable portion of the siding board. Now begin attaching the rain screen clips to the top of the siding board. Space the rain screen clips at 16” on center using 2 screws per clip. For shorter runs, don't skimp on the clips, add an extra clip anywhere needed. The more clips you use, the better the board will behave over time.
Step 9 - Repeat the clip installation process for each row of siding. A major benefit of this system is that you can use full length siding boards. Wherever you need to make a joint in the length of siding, simply use a rain screen clip at the bottom and top of the joint and straddle the two boards. You will automatically get proper alignment of the two boards. Always use two clips to secure the ends of siding boards. When butting two siding boards together it is a best practice to use the ‘scarf joint’ or ‘scarph joint’ technique. A 45-degree angle at each end of cut boards work best. Master craftsmen prefer this method for best results and a quality installation you will be proud of for years. (If you use standard butt joints with 90-degree cuts, over time, the joints may open with weather exposure.)
*Note - Always apply Anchor Seal or similar end sealer product immediately after cutting any hardwood boards. This will help minimize potential end-checking of your siding boards.
Step 10 - Installing the top row of siding. When you reach the soffit (or areas below window openings), it is typically necessary to rip the top of the wood siding to the appropriate width.
Note* If you trim the width ¼” narrower than required, it will be easier to install the siding and allows for better ventilation at the top of the rain screen wall cavity. The bottom edge of the top row of siding will seat in the rain screen clip. The top edge of the siding will need to be drilled and face screwed to blocking behind the siding. We suggest short pieces of solid wood blocking behind where you will be screwing and placing siding vent between the blocking to allow continuous uninterrupted ventilation at the top of your rain screen wall system.